技術者ブログ:Outsystemsデータベースの外部DB化

技術者ブログとして日ごろ取り組んでいる学習内容をご紹介します。
今回は、ローコード開発をテーマにしている第2ユニットです。

今回のテーマ:Outsystemsデータベースの外部DB化

Outsystemsでは、アカウントを作成することで、無料のクラウド版である”Personal Environment(PE)”をリクエストすることができます。(参考
これを用いて、小規模ユーザー向けの個人用アプリケーションを開発することができ、その際には2GBのデータベースストレージが与えられます。
ただし、容量に限りがあることに加えて、外部より直接アクセスすることができないなど、いくつか不便な点もあります。

そこで今回は、Outsystemsで作成した内部DBを、テーブル定義はそのままに外部DBへと移行することにしました。
以下はその結果となります。

環境情報

Personal Environment: Version 11.31.0 (Build 43948)
Service Studio: Version 11.54.80 / Build 63652
Data Extractor: 1.4.0

Data Extractorについて

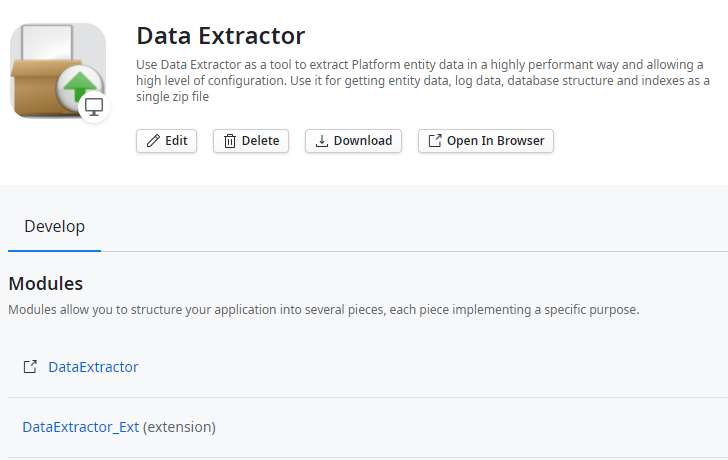
Forgeにて無料で公開されているData Extractorを用いることで、Outsystemsで作成したEntityに対応した実テーブルのDDLを取得することができます。
使い方は以下の通りです:

  1. Forgeより”Data Extractor”をインストール
  2. Open In Browserより画面を起動
  3. ID・パスワードを入力し、ログイン
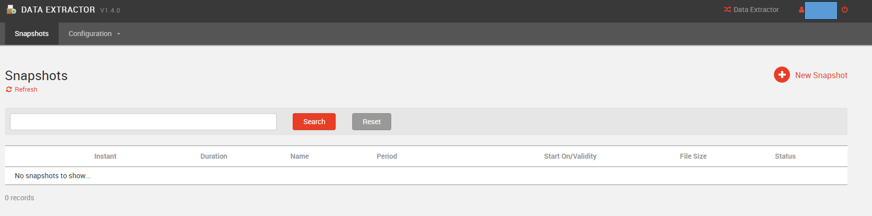
  4. トップページの”New Snapshot”より、新しいスナップショットを作成する
  5. 新規スナップショット画面で、以下を設定する:
    ・Snapshot Name: スナップショットの名称。任意の名称でOK
    ・Extract Configurations: “Table DDL”にチェック。それ以外の項目は任意
    ・Extract Entities: DDLを出力したいEntityをリストに追加する。
     ”Search Entity to Add”リストより前方一致でEntity名を検索できるので、
     選択→Addすることでリストに追加される。
    ・上記以外の項目: 任意。必要に応じて設定。
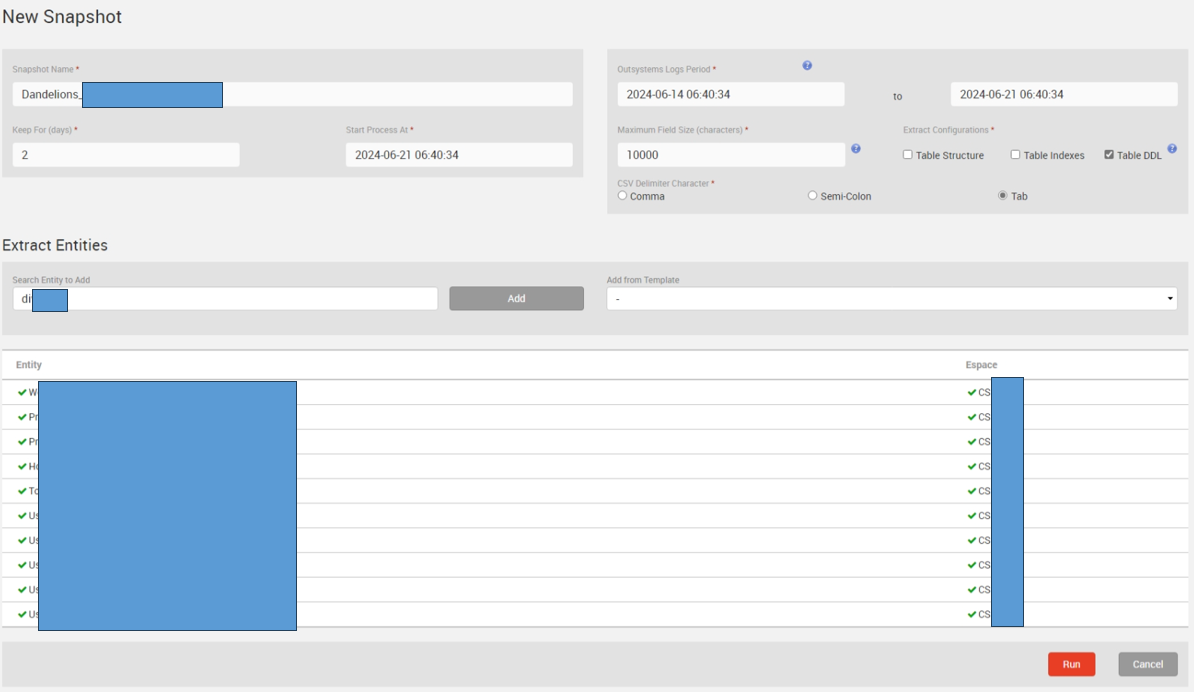
  6. “Run”ボタンを押下すると、トップページの一覧に、
    先ほど入力した作成したSnapshot Nameを持つスナップショットが表示されます。
    作成直後は”Status: Created”ですが、これが”Status: Done”になると右端の”↓”よりダウンロード可能となります。
  7. ダウンロードしたZipファイルの中身は以下の通りです:
    ・[テーブル名].csv.gz: Entityに登録されているデータのエクスポート
     ※手元環境で試した際、日本語は”?”で表示されており正しく読み取れませんでした…
    ・TableDDL.Create.sql.gz: Entityに対応する実テーブルのDDL
     ※以下の内容を含む:
      ・Create Table文
      ・Entity Identifier型の列に対する外部キー制約を付与する、Alter Table文
      ・Entity Identifer型の列に対するインデックスを付与する、Create Index文

上記手順で入手したCreate Table文を実行することで、
自前で用意したSQLServer上に内部DBと同じレイアウトのテーブルを作成できます。

外部DBに作成したテーブルをOutsystemsより参照するには、Service CenterよりDatabase Connectionを作成し、その後、Integration Studioより”Connect to External Table or View”にて設定を行う必要があります。


まとめ

  • Outsystemsでは、内部DBが標準で提供されている
  • 外部DBに移行しようとする場合、ForgeのData Extractorを使用するとEntityのDDLを取得できる
    • データの移行そのものは、日本語を含む列が文字化けする場合があるので、別の手段を検討する必要あり
  • 外部DBに作成したテーブルを参照するには、Database Connectionの作成と、それを通じたテーブルへの接続設定が必要となる

いかがでしたでしょうか?
今後、自前で用意した外部DBへの移行を検討する際、手順の一助になれば幸いです。
第2ユニットでは、これからもOutSystemsなどのローコードツールを使った技術者ブログを展開していきますのでお楽しみに!

Technology Blog: Leveraging AI in System Development (System Testing)

As a tech blog, we’d like to introduce the learning content we’ve been working on daily. We are unit 1, focusing on AI and Big Data. In our previous article, we discussed the possibilities of content creation, education and learning, and business solutions using the chatbot “ChatGPT-4o”. 

This time, we’ll focus on how we can streamline our main business of system development by incorporating AI into system testing to ensure quality.

1. Selenium 4

Overview:

Selenium is a widely used open-source test automation tool, particularly suitable for cross-browser testing. The latest version, Selenium 4, has improved APIs for manipulating UI elements, allowing for more intuitive test script creation. When combined with AI plugins, it also enhances the detection of dynamic UI elements.

  • Usage rate: High
  • Price: Free (open-source)
  • Difficulty level: Intermediate
  • Official website: Selenium Official Website

2. Cypress

Overview:

Cypress is a JavaScript-based test automation tool for web applications, particularly popular among frontend developers. It allows for real-time verification of test results and has a simple setup, making it easy for beginners to get started. It’s ideal for end-to-end testing and makes it easy to test complex user flows.

  • Usage rate: High
  • Price: Free plan available, premium plans (paid)
  • Difficulty level: Beginner to intermediate
  • Official website: Cypress Official Website

3. Katalon Studio

Overview:

 Katalon Studio is a tool that allows for test automation without writing code, supporting a wide range of test scenarios including web applications, mobile apps, and APIs. With its GUI-based operation, even those unfamiliar with programming can intuitively create tests. It provides enterprise-level features while offering a free plan, making it widely used by beginners to advanced users.

  • Usage rate: High
  • Price: Free plan available, enterprise plan (paid)
  • Difficulty level: Beginner to intermediate
  • Official website: Katalon Studio Official Website

4. Applitools

Overview:

Applitools is a tool specialized in visual testing, where AI automatically detects changes in design and UI. It’s particularly strong in visual regression testing and is ideal for testing UI and UX consistency. Its ability to detect subtle differences in design helps in quality assurance for frontend and design.

  • Usage rate: High
  • Price: Paid (free trial available)
  • Difficulty level: Beginner-friendly
  • Official website: Applitools Official Website

In this article, we introduced AI-powered test automation tools for system development. In our next article, we’d like to share our experiences and impressions from actually using these tools. We hope this helps you consider which tool might be best for your project.

技術者ブログ:AIのシステム開発への活用(システムテスト)

技術者ブログとして日ごろ取り組んでいる学習内容をご紹介します。AI、ビッグデータをテーマにしている第1ユニットです。 前回の記事では、チャットボット「ChatGPT-4o」を使って、コンテンツ作成、教育と学習、ビジネスソリューションの可能性について取り上げました。

今回は、私たちの主な業務であるシステム開発において、品質を確保するためにシステムテストにAIを導入し、どのように省力化できるかに注目します。

1. Selenium 4

概要

Seleniumは、オープンソースで広く利用されているテスト自動化ツールで、特にクロスブラウザテストに適しています。最新バージョンのSelenium 4では、UIの要素を操作するためのAPIが改善され、より直感的なテストスクリプト作成が可能です。AIプラグインと組み合わせることで、動的なUI要素の検出も強化されています。

  • 利用率:
  • 利用価格: 無料(オープンソース)
  • 利用難易度: 中級者向け
  • 公式サイト: Selenium公式サイト

2. Cypress

概要

Cypressは、JavaScriptをベースにしたWebアプリケーションのテスト自動化ツールで、特にフロントエンド開発者に人気があります。リアルタイムでテスト結果を確認でき、設定もシンプルなので初心者でもすぐに使い始めることができます。エンドツーエンドテストに最適で、複雑なユーザーフローのテストも容易に行えます。

  • 利用率:
  • 利用価格: 無料プランあり、プレミアムプラン有料
  • 利用難易度: 初心者〜中級者向け
  • 公式サイト: Cypress公式サイト

3. Katalon Studio

概要

Katalon Studioは、コードを書かずにテストを自動化できるツールで、Webアプリケーション、モバイルアプリ、APIなど幅広いテストシナリオに対応しています。GUIベースで操作できるため、プログラミングに不慣れな人でも直感的にテスト作成が可能です。エンタープライズレベルの機能を提供しつつ、無料プランも利用できるため、初心者から上級者まで幅広く利用されています。

  • 利用率:
  • 利用価格: 無料プランあり、エンタープライズプラン有料
  • 利用難易度: 初心者〜中級者向け
  • 公式サイト: Katalon Studio公式サイト

4. Applitools

概要

Applitoolsは、ビジュアルテストに特化したツールで、デザインやUIの変更をAIが自動的に検出します。特にビジュアルレグレッションテストに強く、UIやUXの一貫性を保つためのテストに最適です。デザインの細かな違いを検出する機能により、フロントエンドやデザインの品質保証に役立ちます。

  • 利用率:
  • 利用価格: 有料(無料トライアルあり)
  • 利用難易度: 初心者向け
  • 公式サイト: Applitools公式サイト

今回は、システム開発におけるAIを活用したテスト自動化ツールについて紹介しました。次回は、これらのツールを実際に使用してみた体験談や感想をお伝えしたいと思います。どのツールがあなたのプロジェクトに最適か、ぜひ参考にしてみてください。

【WordPress】How To Use Elementor (Grid Layout Creation)

This is Unit 0, focusing on web design. In this Engineers blog, I want to introduce some of the topics I’ve been working on daily. This time, I will explain how to use the WordPress plugin, Elementor. By using the Elementor plugin, you can intuitively create web page layouts with drag-and-drop operations. No programming skills are required. In this post, I will explain the basic usage of Elementor.

Elementor Installation and Validation

Elementor is not compatible with all WordPress themes, so we recommend using a supported theme. For this example, we are using the official Elementor theme: HelloElementor.

Booting Up Elementor

Go ahead and create a new fixed page. Now selsect “Edit with Elementor”

About Elementor Widgets

The features provided by Elementor are called “widgets.” You can see a list of widgets on the left side of the screen.

With the paid version, you can access more widgets. As of September 2024, there are four plans available for the paid version, with upgrades ranging from $59 to $399 per year.

Creating a Layout

First, use the “Layout” widget to determine the structure of your web page.

In Elementor, there are two types of page layouts: Flexbox and Grid.

In earlier versions, Elementor layouts were made up of “Sections,” but in recent updates, the concept of “Containers” has been introduced leading to the deprecation of “Sections”.

 In this example, we will create a layout using a Grid.

By default, a Grid layout with 3 columns and 2 rows will be created.

Detailed settings can be adjusted by clicking “Edit Grid” on the left side of the screen.

Placing Elements in the Grid

 You can easily create a web page by placing elements from the basic widgets.

Simply by using mouse operations, you can easily position content commonly used on web pages.

 In the future, I plan to cover more detailed setting methods.

As introduced previously, you can also easily conduct tests using the “LOCAL” environment so please give it a try. 

Stay tuned for the next technical blog post.

【WordPress】Elementorの使い方(Gridレイアウトの作成)

WEBデザインをテーマにしている第0ユニットです。

技術者ブログとして日ごろ取り組んでいる学習内容をご紹介します。

今回はWordPressの人気プラグイン「Elementor」の使い方をご紹介します。

Elementorプラグインを利用することで、ドラッグ&ドロップ操作で、直感的にウェブページのレイアウトを作成できます。

プログラミングのスキルは不要です。

今回はElementorの基本的な使い方を説明します。

Elementorのインストール&有効化

Elemenetorは全てのWordPressテーマで使用できるというわけではありません。推奨されるテーマを使いましょう。

今回はElementor公式のHelloElementorのテーマを使用しています。

Elementorの起動

固定ページを新規作成し、Elementorを起動します。

Elementorのウィジェットについて

Elementorが提供する機能は「ウィジェット」と呼ばれています。左側にウィジェットのリストが並んでいることが分かります。

有料版であればより多くのウィジェットを利用可能です。2024年9月時点では有料版には4つのプランがあり、$59~$399/1年でアップグレードが可能です。

レイアウトの作成

先ずは、ウィジェットの「レイアウト」を利用しウェブページの構造を決めます。

ElementorではウェブページのレイアウトのタイプはFlexboxとGridの2種類があります。

少し前のバージョンでは、Elementorのレイアウトは「セクション」というもので構成されていましたが、バージョンアップを経て「コンテナ」という考え方が導入されたことにより「セクション」が廃止されています。

今回はGridでレイアウトを作成します。

デフォルトでは横3列、縦2行のGridレイアウトが作成されます。

詳細な設定は、画面左部の「Gridを編集」にて可能です。

Gridに要素を配置

基本のウィジェットから要素を配置することで、簡単にウェブページが作成できます。

マウス操作だけで、簡単にウェブページで多用するコンテンツが配置できます。

今後は細かい設定方法についても見ていきたいと思います。

前回ご紹介した「LOCAL」の環境で簡単に試作できるので是非試してください。

次回の技術者ブログもお楽しみに。

技術者ブログ – UTMの強化設定

技術者ブログとして日ごろ取り組んでいる学習内容をご紹介します。
今回はインフラをテーマにしている第3ユニットです。

第3ユニットは、ダンデライオンズの社内ネットワークを管理しています。そのセキュリティを強化するために、FortiGateというUTM機器を導入しています。「UTM」は、「Unified Threat Management」の略であり、「統合脅威管理」という意味になります。つまり、一つの機器を以て、ネットワークセキュリティ全般を管理できます。

今回の技術者ブログでは、FortiGateの三つの機能を紹介します。

① Eメールフィルタ

スパム対策として、FortiGateが、受信するメールの内容を確認して、スパムの疑いがあると検知されたメールの件名に任意のタグを追加できます。

[Spam]というタグを追加しています。

② 侵入防止

プログラムの脆弱性、ボットネットとその他の侵入を防止する機能です。「その他の侵入」は、例えば、サーバーの認証系ファイルをアクセスしようとすることになります。

Linuxサーバーの認証系ファイルへのアクセスを防止します。

③ アプリケーションコントロール

特定のアプリケーション(プログラム)を使用不可に設定できる機能であると思いきや、個別に実行可能なプログラムにとどまらず、ウェブサイトの使用も制限できます。

YouTube(ウェブサイト)の使用を細かく制限できます。

次回の技術者ブログをお楽しみに。

Tech Blog: About Outsystems Developer Cloud

As a technical blog, I would like to introduce the learning content that I am working on on a daily basis.

This time, it is the second unit, which is themed on low-code development.

Theme of this time: “About Outsystems Developer Cloud”
We, the second unit, are currently conducting low-code development using OutSystems 11, and in this blog we introduce the development method and other aspects.
This time, we will introduce “OutSystems Developer Cloud”, which was released in Japan by OutSystems in April 2023.

What is an Outsystems Developer Cloud?

Outsystems Developer Cloud (hereinafter referred to as ODC) is a cloud-native (created to run on the cloud) low-code application development platform provided by OutSystems.

It is based on the native cloud service of Amazon Web Service (AWS) and supports Kubernetes, Linux containers, microservices, etc.

Technologies used in ODC

As a cloud-native platform, ODC uses technologies to provide benefits such as agility, availability, and fault tolerance, and is used to support the above services. Here are some of those technologies.

Microservices
Microservices is a technique for building one large application by combining multiple independent small services through communication via APIs and web services. Since the correlation between individual functions is low, failures or increased load in one function are less likely to affect other functions. In addition, since changes and expansions of functions can be made only to the target service, agility in changes and expansions is high.
However, since it is more difficult to maintain consistency as a whole system than creating a single application, attention must be paid to the design of the whole system, data management, and API management.

Containerization
Containerization is a technology in virtualization technology that combines the elements required to run in any computing environment (from the execution environment to the application) into one package. It enables rapid development without having to worry about the underlying environment.

Autoscaling
Autoscaling is a function that monitors the CPU and RAM usage of each application and automatically increases or decreases the capacity of the application according to the load. Autoscaling allows the build service and other services to be used simultaneously without degrading the performance of the platform.

Advantages of ODC


Usually, building a cloud-native application platform requires huge costs and time. With ODC, OutSystems handles the tedious work involved in building it, so you can introduce cloud-native services with less effort than building it from scratch.

Although there are some differences from OutSystems’ existing low-code development platform, OutSystems 11, there are no major differences in basic functions.

With ODC, you can design, develop, and deploy by taking advantage of the high productivity of OutSystems 11 and the advantages of cloud-native services.

Currently, ODC does not have a free trial that you can immediately install like Outsystems 11, but UI images of the development screen are posted on the Outsystems website.

If you have not tried Outsystems products, try installing a trial of Outsystems 11 first and compare it with the ODC screen.

About the trial installation of Outsystems 11:
Engineer blog: Introducing Outsystems and creating sample screens – dandelionS Blog
About the ODC UI:
UI overview of ODC Portal and ODC Studio – ODC Documentation (outsystems.com)

Summary

This time, we introduced “Outsystems Developer Cloud”.
Our company is currently using OutSystems 11, so in the future I would like to delve deeper into the differences between OutSystems 11 and ODC, how to use them for development purposes, and what to do if you want to migrate to ODC!

In the second unit, we will continue to publish blogs for engineers using low-code tools such as OutSystems, so stay tuned.

技術者ブログ:Outsystems Developer Cloudについて

技術者ブログとして日ごろ取り組んでいる学習内容をご紹介します。
今回は、ローコード開発をテーマにしている第2ユニットです。

今回のテーマ:『Outsystems Developer Cloudについて』

私たち第2ユニットは、現在OutSystems 11を使用したローコード開発を行っており、ブログではその開発方法などをご紹介しています。(前回の第2ユニット技術者ブログはこちら
今回は、OutSystemsから2023年4月より日本国内リリースされている『OutSystems Developer Cloud』についてご紹介します。

Outsystems Developer Cloudとは?

Outsystems Developer Cloud(以下、ODCと表記)とは、OutSystemsが提供するクラウドネイティブの(クラウド上で稼働することを前提に作成されている)ローコードアプリケーション開発プラットフォームです。
Amazon Web Service(AWS)のネイティブクラウドサービスを基盤としており、Kubernetes、Linuxコンテナ、マイクロサービスなどをサポートします。

ODCで使用されている技術

ODCはクラウドネイティブプラットフォームとして、俊敏性や可用性、耐障害性などのメリットを発揮するための技術が、上記サービスのサポートなどによって使用されています。その技術の一部をご紹介します。

マイクロサービス

マイクロサービスとは、複数の独立した小さなサービスをAPIやwebサービスを介して通信することで組み合わせ、一つの大きなアプリケーションを構築する手法のことです。個々の機能の関連性が低くなるので、ある機能での障害や負荷増大が他の機能に及びにくくなります。また、機能の変更や拡張も対象のサービスにのみ行うことが可能なので、変更・拡張における俊敏性が高くなります。
しかし、一つのアプリケーションで作成するよりもシステム全体としての一貫性を保つことが難しくなるため、システム全体の設計やデータの管理、APIの管理に注意する必要があります。

コンテナ化

コンテナ化とは、仮想化技術において、あらゆるコンピューティング環境で実行するために必要な要素(実行環境からアプリケーションまで)を一つのパッケージにまとめる技術のことです。基盤の環境を気にする必要がなく、迅速な開発を可能にします。

オートスケーリング

オートスケーリングは、各アプリケーションのCPUやRAMの使用状況を監視し、負荷に従ってアプリケーションの容量を自動的に増減させる機能です。オートスケーリングによって、プラットフォームのパフォーマンスを低下させることなく、ビルドサービスやその他のサービスを同時に使用できます。

ODCのメリット

通常、クラウドネイティブのアプリケーションプラットフォーム構築には、膨大な費用と時間を必要とします。ODCでは構築に係る面倒な作業はOutSystems側で実施するので、0から構築するよりも手間をかけずにクラウドネイティブサービスを導入することができます。
また、OutSystemsの既存ローコード開発プラットフォーム『OutSystems 11』といくつか違いはありますが、基本的な機能については大きな差はありません。
ODCでは、OutSystems 11の生産性の高さとクラウドネイティブサービスの利点を活かした設計、開発、デプロイなどが可能です。

現在、ODCにはOutsystems11のようにすぐに導入できる無償トライアルはありませんが、開発画面のUIイメージなどはOutsystems webサイトに掲載されています。
Outsystems製品を試したことがない方は、まずはOutsystems11のトライアルを導入してみてODCの画面と見比べてみてください。

Outsystems11のトライアル導入について:
技術者ブログ:Outsystems導入とサンプル画面作成の紹介 – dandelionS Blog
ODCのUIについて:
UI overview of ODC Portal and ODC Studio – ODC Documentation (outsystems.com)

まとめ

今回は『Outsystems Developer Cloud』についてご紹介しました。
当社では現在OutSystems 11を使用しているので、今後はOutSystems 11とODCの違いや開発目的における使い分け、もしODCに移行したいとなった時の方法について深堀できればと思います!

第2ユニットではこれからもOutSystemsなどのローコードツールを使った技術者ブログを展開していきますのでお楽しみに。

Tech Blog: ChatGPT-4o: OpenAI Unleashes New Possibilities for Innovative Conversational AI

As a technical blog, I would like to introduce the learning content that I am working on on a daily basis. This is the first unit on the theme of AI and big data. The theme this time is OpenAI’s latest model, ChatGPT-4o. For each section, we will have ChatGPT4o create images and image descriptions.

In the world of artificial intelligence, OpenAI has always been at the forefront of innovative advancements, especially in the field of large-scale language models (LLMs). The newly announced ChatGPT-4o represents a breakthrough in the field of conversational AI, introducing various enhancements that allow users to interact with language in unprecedented ways.

Unlocking the Power of ChatGPT-4o
ChatGPT-4o builds on the foundations of its predecessor, ChatGPT, and introduces a set of sophisticated features that take its capabilities to new heights. Let’s take a closer look at the key features that set ChatGPT-4o apart.

  1. Enhanced Speed ​​and Efficiency:

ChatGPT-4o runs twice as fast as its predecessor while cutting computational costs in half. This incredible efficiency translates into a smoother and more responsive user experience, especially when conducting complex tasks or long conversations.

  1. Expanded Message Limits:

Free users of ChatGPT-4o now have a 5x increase in message allowance, allowing them to interact with the model for extended periods of time without restrictions and explore its full potential. This answers the growing demand to freely explore language capabilities.

  1. Multilingual Mastery:

ChatGPT-4o transcends language boundaries, enabling seamless conversations across multiple languages. This multilingual capability allows users to engage in meaningful interactions with audiences around the world, fostering intercultural understanding and cooperation.

  1. Multimodal Integration:

ChatGPT-4o seamlessly integrates text, audio, and visual data for a more comprehensive and immersive conversational experience. This multimodal capability opens new avenues for creative expression, knowledge exploration, and interactive storytelling.

Explore the applications of ChatGPT-4o
ChatGPT-4o’s enhanced features empower users across a range of sectors to explore its potential.

  1. Content Creation:

ChatGPT-4o can be a powerful tool for content creators, generating a variety of creative text formats, translating languages ​​accurately, and creating engaging content that resonates with audiences.

  1. Education and Learning:

In the education sector, ChatGPT-4o innovates the learning experience by providing personalized instruction, answering questions in an informative manner, and generating summaries of complex topics. This personalized approach caters to individual learning styles and promotes deeper understanding.

  1. Business Solutions:

Businesses can leverage ChatGPT-4o in a variety of ways to enhance their operations. From developing customer service chatbots that provide 24/7 support to conducting market research analysis and generating compelling marketing copy, ChatGPT-4o streamlines business processes and drives growth.

Conclusion: A Look into the Future of Conversational AI
ChatGPT-4o marks an important milestone in the evolution of conversational AI, offering a glimpse into a future where humans and machines can interact with unprecedented levels of understanding and nuance. Its enhanced speed, expanded features, and multilingual capabilities will make ChatGPT-4o a valuable tool for individuals and organizations across sectors. As ChatGPT-4o continues to evolve, we expect to see even more groundbreaking applications emerge, transforming the way we communicate, learn, and create.

技術者ブログ:ChatGPT-4o:OpenAIが放つ革新的な会話型AIの新たな可能性

技術者ブログとして日ごろ取り組んでいる学習内容をご紹介します。今回はAI、ビッグデータをテーマにしている第1ユニットです。 今回のテーマはOpenAIの最新モデル、ChatGPT-4oについて説明させていただきます。セクションごとにChatGPT4oに画像と画像の説明を作成させてみます。

人工知能の世界において、OpenAIは常に革新的な進歩の最前線に立っており、特に大規模言語モデル(LLM)の分野においては目覚ましい成果を上げてきました。今回発表されたChatGPT-4oは、会話型AIの分野における飛躍的な進歩を意味しており、ユーザーが言語と前例のない方法で対話できるよう、様々な機能強化を導入しています。


ChatGPT-4oの力強さを解き明かす
ChatGPT-4oは、前モデルであるChatGPTの基盤の上に構築されており、その能力を新たな高みに引き上げる一連の洗練された機能を導入しています。ChatGPT-4oを際立たせる主要な機能について詳しく見ていきましょう。

1. 強化された速度と効率性:

ChatGPT-4oは、前モデルの2倍の速度で動作し、同時に計算コストを半分に削減します。この驚異的な効率性は、特に複雑なタスクや長時間の会話を行う際に、よりスムーズで応答性の高いユーザー体験を実現します。

2. メッセージ制限の拡大:

ChatGPT-4oの無料ユーザーは、メッセージ許容量が5倍に増加し、制限なく長時間モデルと対話して、その完全な可能性を探求できるようになりました。これは、言語能力を自由に探求したいという高まる需要に応えます。

3. 多言語マスター:

ChatGPT-4oは言語の境界を超え、複数の言語間でシームレスな会話を可能にします。この多言語能力により、ユーザーは世界中の視聴者と有意義な交流を行うことができ、異文化理解と協力を促進します。

4. マルチモーダル統合:

ChatGPT-4oは、テキスト、音声、視覚データをシームレスに統合し、より包括的で没入感のある会話体験を実現します。このマルチモーダル機能は、創造的な表現、知識探求、インタラクティブなストーリーテリングのための新たな道を開きます。


ChatGPT-4oの応用例を探る
ChatGPT-4oの強化された機能は、様々な分野のユーザーがその可能性を探求する力を与えます。

1. コンテンツ作成:

ChatGPT-4oはコンテンツ制作者にとって強力なツールとなり、様々なクリエイティブなテキスト形式を生成し、言語を正確に翻訳し、視聴者に響く魅力的なコンテンツを作成することができます。

2. 教育と学習:

教育分野では、ChatGPT-4oは個別指導を提供し、質問に情報提供的な方法で答え、複雑なトピックのサマリーを生成することで、学習体験を革新します。この個別化されたアプローチは、個々の学習スタイルに対応し、より深い理解を促進します。

3. ビジネスソリューション:

企業は、ChatGPT-4oを様々な方法で活用して業務を強化することができます。24時間365日サポートを提供する顧客サービスチャットボットの開発から、市場調査分析の実施、説得力のあるマーケティングコピーの生成まで、ChatGPT-4oはビジネスプロセスを合理化し、成長を促進します。

結論:会話型AIの未来への展望
ChatGPT-4oは、会話型AIの進化における重要なマイルストーンであり、人間と機械がかつてないレベルの理解とニュアンスで対話できる未来への展望を示しています。強化された速度、拡張された機能、多言語能力により、ChatGPT-4oは、様々な分野の個人や組織にとって貴重なツールとなります。ChatGPT-4oの進化が進むにつれて、さらに画期的なアプリケーションが登場し、コミュニケーション、学習、創造のあり方を変革していくことでしょう。