Engineer Blog – About QR Code Generation

Welcome to our engineer blog, where we share our ongoing learning experiences. This post is part of Unit 0, which focuses on web design. Today, I’d like to introduce an opportunity I had to work with something less commonly encountered: QR code generation.

Preparation

For this implementation, I used Java. Since my development environment is Gradle-based, adding the necessary libraries was as simple as including the following in the build.gradle file. (Isn’t it convenient how accessible things have become these days?)

Reference Site:
Getting Started Developing · zxing/zxing Wiki · GitHub

The library used here is ZXing, an open-source Java library that enables the creation and reading of one-dimensional codes (such as barcodes) and two-dimensional codes (like QR codes).

Implementation

The key element for generating QR codes is the encode method of the QRCodeWriter class. As summarized in the comments, the following parameters can be specified:

  1. First parameter: The content to be displayed.
  2. Second parameter: The output format ( BarcodeFormat from the ZXing 3.5.3 API).
  3. Third parameter: The dimensions.

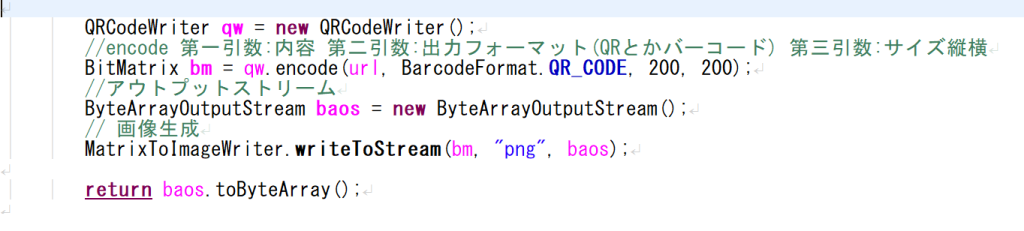
The generated data is stored in a variable of type BitMatrix (bm). By specifying the output format in the writeToStream method, you can save the generated QR code in your desired format. In this case, we output the QR code in PNG format.

While the actual implementation involves handling API requests and returning the output result to the screen, I’ll omit those details here.

Summary

Nowadays, if you just want to generate a QR code once for testing purposes, there’s no need to write a program from scratch. You can find many online QR code generators with just a quick search. Some even let you customize the design or offer formats tailored to specific use cases, making them surprisingly fun to explore.

This post covered only the basics, but I hope it gave you an idea of how QR code generation works. If you found this interesting, I’d be delighted.

Stay tuned for the next engineer blog post!

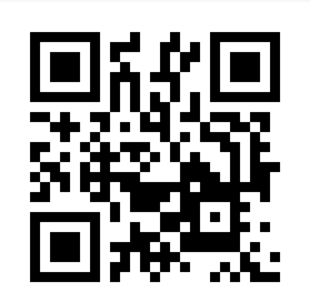
P.S. The content of the QR code includes a closing message!

技術者ブログ –QRコード生成について

技術者ブログとして日ごろ取り組んでいる学習内容をご紹介します。
今回はWEBデザインをテーマにしている第0ユニットです。
普段触ることないQRコード生成について触れる
機会があったので、そちらをご紹介したいと思います。

準備

今回はjavaで作っていきたいと思います。
私の開発環境はgradleを使っているので、
build.gradleファイルに以下追記してあげるだけで、必要なライブラリーが読み込まれます。
(便利な世の中になりましたね…)

参考サイト:Getting Started Developing · zxing/zxing Wiki · GitHub

使用しているライブラリーは、「ZXing」です。
Javaで実装されているオープンソースで、一次元コード(バーコードなど)、二次元コード(QRコードなど)の作成/読取を行うことができる画像処理ライブラリです。

作成

作成するにあたってポイントになるのが、「QRCodeWriter」の「encode」メソッドです。
コメントにざっくり書いてありますが、以下パラメータを指定することができます。
第一引数:表示する内容
第二引数:出力フォーマット指定(BarcodeFormat (ZXing 3.5.3 API))
第三引数:縦横のサイズ

生成したものをBitMatrix型の変数(bm)に格納し、writeToStreamメソッドで出力形式を指定すれば出力することができます。今回はQRコードをpng形式で出力してみました。
本実装はAPIリクエストを受け付けてそれに対応する出力結果を画面に返却していますが、
そこの部分は割愛します。

まとめ

今の時代は、一回だけお試しに作りたい時などの場合、わざわざプログラムを組まなくても
ネットで検索すれば多数の生成サイトが見つかります。
中にはデザインをいじれたり、用途に応じてフォーマットが用意されていたりと探してみると意外と面白いです。
というわけで、本投稿ではシンプルな部分だけではありますが、
QRコードを作成する仕組みをご紹介致しました。
少しでも興味を持っていただければ幸いです。

それでは、次回の技術者ブログをお楽しみに。

※QRコード内容は締めの挨拶です!

技術者ブログ – 社内セキュリティ訓練 (訓練メール)

技術者ブログとして日ごろ取り組んでいる学習内容をご紹介します。

社員のセキュリティ教育の一環として訓練メールを実施しました。

訓練メールとは

標的型攻撃メールを模した疑似的なメールを従業員に送信して、攻撃メールへの対応能力を養うためのものです。
標的型攻撃メールは、重大な情報を盗むことを目的として特定の組織や個人に送信される巧妙な攻撃手法です。

そこで、訓練メールでは、業務用メールなどに似た疑似攻撃メールを対象従業員に送信し、メールを開封したかどうか、添付ファイルを開いたかどうか評価しました。

実際に行ったこと

1.引っ掛かりやすいメール文章を作成

何気なく開いてしまうかもしれないメールの文章や、名前を考えてメールを作成しました。

訓練メールを行った時期にありえそうなメールを作ることを考えました。

訓練メール文章

2.偽ウイルスファイル(Word)作成

今回は、Wordファイル内に、ファイルを開くと自社で管理しているサーバへアクセスする仕組みを組み込みました。

訓練メールで、添付ファイルを開いてしまったら、

サーバへアクセスし、Word内に仕組まれていたIDをログに出力します。

出力されたIDによって、どの従業員が添付ファイルを開いたか特定できます。

ちなみに、今回の訓練で数人添付ファイルを開いてしまいました。

訓練メールの仕組み

3.社内再教育

再度社内教育を行い標的型メールへの対策を再認識しました。

再教育資料

まとめ

今回の訓練により従業員のセキュリティ意識の向上になったかと思います。
今後も、続けていきたいと思いました。

以上となります。

次回の技術者ブログをお楽しみに。

Engineering Blog: Migrating Outsystems Database to an External DB

Welcome to our engineering blog, where we share the learning experiences we’re engaged in daily. This time, we’re focusing on low-code development in Unit 2.

Today’s Theme: Migrating Outsystems Database to an External DB

In Outsystems, you can request a free cloud version called the Personal Environment (PE) by creating an account. (What is an OutSystems Personal Environment – OutSystems Support)
Using this environment, you can develop personal applications for small-scale users and are provided with 2GB of database storage.

However, there are some inconveniences, such as limited storage capacity and the inability to access the database directly from external sources. To address these issues, we decided to migrate the internal database created in Outsystems to an external database while keeping the table definitions unchanged. Below are the results of this migration.

Environment Information

Personal Environment: Version 11.31.0 (Build 43948)
Service Studio: Version 11.54.80 / Build 63652
Data Extractor: 1.4.0

About Data Extractor

By using Data Extractor, freely available on the Forge, you can obtain the actual table DDL corresponding to the Entities created in Outsystems. Here’s how to use it:

  1. Install “Data Extractor” from the Forge.
  2. Launch the application via “Open In Browser.”
  3. Log in by entering your ID and password.
  4. Create a new snapshot by clicking “New Snapshot” on the top page.
  5. Configure the new snapshot with the following settings:
    ・Snapshot Name: Give your snapshot a name. Any name is fine.
    ・Extract Configurations: Check the “Table DDL” option. Other items are optional.
    ・Extract Entities: Add the Entities for which you want to output the DDL to the list.
     Use the “Search Entity to Add” feature to find Entities by prefix matching. Select the desired Entity and click “Add” to include it in the list.
    Other Items: Optional. Configure as needed.
  6. Click the “Run” button. Your snapshot will appear in the list on the top page with the status “Created.” Once the status changes to “Done,” you can download it by clicking the “↓” icon on the far right.
  7. Contents of the downloaded Zip file:
    ・[TableName].csv.gz: Export of data registered in the Entity.
    ※Note: In our testing environment, Japanese characters were displayed as “?” and could not be read correctly.
    ・TableDDL.Create.sql.gz: DDL of the actual table corresponding to the Entity.
    ※Includes the following:
     ・Create Table statements
     ・Alter Table statements to add foreign key constraints to columns of the Entity Identifier type
     ・Create Index statements to add indexes to columns of the Entity Identifier type

By executing the Create Table statements obtained through these steps, you can create tables with the same layout as the internal database on your own SQL Server.

To reference the tables created in the external database from Outsystems, you’ll need to create a Database Connection via the Service Center and then set up the connection to the tables through “Connect to External Table or View” in Integration Studio.

Summary

  • Outsystems provides an internal database by default.
  • To migrate to an external database, you can obtain the Entity’s DDL using the Data Extractor from the Forge.
    • For data migration, alternative methods may be necessary since columns containing Japanese characters might become garbled.
  • Referencing tables in the external database requires creating a Database Connection and setting up connections through it.

How did you find this guide?
We hope these steps will be helpful when you consider externalizing your own database in the future.
Our Unit 2 team will continue to share engineering blogs using low-code tools like OutSystems, so stay tuned!

技術者ブログ:Outsystemsデータベースの外部DB化

技術者ブログとして日ごろ取り組んでいる学習内容をご紹介します。
今回は、ローコード開発をテーマにしている第2ユニットです。

今回のテーマ:Outsystemsデータベースの外部DB化

Outsystemsでは、アカウントを作成することで、無料のクラウド版である”Personal Environment(PE)”をリクエストすることができます。(参考
これを用いて、小規模ユーザー向けの個人用アプリケーションを開発することができ、その際には2GBのデータベースストレージが与えられます。
ただし、容量に限りがあることに加えて、外部より直接アクセスすることができないなど、いくつか不便な点もあります。

そこで今回は、Outsystemsで作成した内部DBを、テーブル定義はそのままに外部DBへと移行することにしました。
以下はその結果となります。

環境情報

Personal Environment: Version 11.31.0 (Build 43948)
Service Studio: Version 11.54.80 / Build 63652
Data Extractor: 1.4.0

Data Extractorについて

Forgeにて無料で公開されているData Extractorを用いることで、Outsystemsで作成したEntityに対応した実テーブルのDDLを取得することができます。
使い方は以下の通りです:

  1. Forgeより”Data Extractor”をインストール
  2. Open In Browserより画面を起動
  3. ID・パスワードを入力し、ログイン
  4. トップページの”New Snapshot”より、新しいスナップショットを作成する
  5. 新規スナップショット画面で、以下を設定する:
    ・Snapshot Name: スナップショットの名称。任意の名称でOK
    ・Extract Configurations: “Table DDL”にチェック。それ以外の項目は任意
    ・Extract Entities: DDLを出力したいEntityをリストに追加する。
     ”Search Entity to Add”リストより前方一致でEntity名を検索できるので、
     選択→Addすることでリストに追加される。
    ・上記以外の項目: 任意。必要に応じて設定。
  6. “Run”ボタンを押下すると、トップページの一覧に、
    先ほど入力した作成したSnapshot Nameを持つスナップショットが表示されます。
    作成直後は”Status: Created”ですが、これが”Status: Done”になると右端の”↓”よりダウンロード可能となります。
  7. ダウンロードしたZipファイルの中身は以下の通りです:
    ・[テーブル名].csv.gz: Entityに登録されているデータのエクスポート
     ※手元環境で試した際、日本語は”?”で表示されており正しく読み取れませんでした…
    ・TableDDL.Create.sql.gz: Entityに対応する実テーブルのDDL
     ※以下の内容を含む:
      ・Create Table文
      ・Entity Identifier型の列に対する外部キー制約を付与する、Alter Table文
      ・Entity Identifer型の列に対するインデックスを付与する、Create Index文

上記手順で入手したCreate Table文を実行することで、
自前で用意したSQLServer上に内部DBと同じレイアウトのテーブルを作成できます。

外部DBに作成したテーブルをOutsystemsより参照するには、Service CenterよりDatabase Connectionを作成し、その後、Integration Studioより”Connect to External Table or View”にて設定を行う必要があります。


まとめ

  • Outsystemsでは、内部DBが標準で提供されている
  • 外部DBに移行しようとする場合、ForgeのData Extractorを使用するとEntityのDDLを取得できる
    • データの移行そのものは、日本語を含む列が文字化けする場合があるので、別の手段を検討する必要あり
  • 外部DBに作成したテーブルを参照するには、Database Connectionの作成と、それを通じたテーブルへの接続設定が必要となる

いかがでしたでしょうか?
今後、自前で用意した外部DBへの移行を検討する際、手順の一助になれば幸いです。
第2ユニットでは、これからもOutSystemsなどのローコードツールを使った技術者ブログを展開していきますのでお楽しみに!

Technology Blog: Leveraging AI in System Development (System Testing)

As a tech blog, we’d like to introduce the learning content we’ve been working on daily. We are unit 1, focusing on AI and Big Data. In our previous article, we discussed the possibilities of content creation, education and learning, and business solutions using the chatbot “ChatGPT-4o”. 

This time, we’ll focus on how we can streamline our main business of system development by incorporating AI into system testing to ensure quality.

1. Selenium 4

Overview:

Selenium is a widely used open-source test automation tool, particularly suitable for cross-browser testing. The latest version, Selenium 4, has improved APIs for manipulating UI elements, allowing for more intuitive test script creation. When combined with AI plugins, it also enhances the detection of dynamic UI elements.

  • Usage rate: High
  • Price: Free (open-source)
  • Difficulty level: Intermediate
  • Official website: Selenium Official Website

2. Cypress

Overview:

Cypress is a JavaScript-based test automation tool for web applications, particularly popular among frontend developers. It allows for real-time verification of test results and has a simple setup, making it easy for beginners to get started. It’s ideal for end-to-end testing and makes it easy to test complex user flows.

  • Usage rate: High
  • Price: Free plan available, premium plans (paid)
  • Difficulty level: Beginner to intermediate
  • Official website: Cypress Official Website

3. Katalon Studio

Overview:

 Katalon Studio is a tool that allows for test automation without writing code, supporting a wide range of test scenarios including web applications, mobile apps, and APIs. With its GUI-based operation, even those unfamiliar with programming can intuitively create tests. It provides enterprise-level features while offering a free plan, making it widely used by beginners to advanced users.

  • Usage rate: High
  • Price: Free plan available, enterprise plan (paid)
  • Difficulty level: Beginner to intermediate
  • Official website: Katalon Studio Official Website

4. Applitools

Overview:

Applitools is a tool specialized in visual testing, where AI automatically detects changes in design and UI. It’s particularly strong in visual regression testing and is ideal for testing UI and UX consistency. Its ability to detect subtle differences in design helps in quality assurance for frontend and design.

  • Usage rate: High
  • Price: Paid (free trial available)
  • Difficulty level: Beginner-friendly
  • Official website: Applitools Official Website

In this article, we introduced AI-powered test automation tools for system development. In our next article, we’d like to share our experiences and impressions from actually using these tools. We hope this helps you consider which tool might be best for your project.

技術者ブログ:AIのシステム開発への活用(システムテスト)

技術者ブログとして日ごろ取り組んでいる学習内容をご紹介します。AI、ビッグデータをテーマにしている第1ユニットです。 前回の記事では、チャットボット「ChatGPT-4o」を使って、コンテンツ作成、教育と学習、ビジネスソリューションの可能性について取り上げました。

今回は、私たちの主な業務であるシステム開発において、品質を確保するためにシステムテストにAIを導入し、どのように省力化できるかに注目します。

1. Selenium 4

概要

Seleniumは、オープンソースで広く利用されているテスト自動化ツールで、特にクロスブラウザテストに適しています。最新バージョンのSelenium 4では、UIの要素を操作するためのAPIが改善され、より直感的なテストスクリプト作成が可能です。AIプラグインと組み合わせることで、動的なUI要素の検出も強化されています。

  • 利用率:
  • 利用価格: 無料(オープンソース)
  • 利用難易度: 中級者向け
  • 公式サイト: Selenium公式サイト

2. Cypress

概要

Cypressは、JavaScriptをベースにしたWebアプリケーションのテスト自動化ツールで、特にフロントエンド開発者に人気があります。リアルタイムでテスト結果を確認でき、設定もシンプルなので初心者でもすぐに使い始めることができます。エンドツーエンドテストに最適で、複雑なユーザーフローのテストも容易に行えます。

  • 利用率:
  • 利用価格: 無料プランあり、プレミアムプラン有料
  • 利用難易度: 初心者〜中級者向け
  • 公式サイト: Cypress公式サイト

3. Katalon Studio

概要

Katalon Studioは、コードを書かずにテストを自動化できるツールで、Webアプリケーション、モバイルアプリ、APIなど幅広いテストシナリオに対応しています。GUIベースで操作できるため、プログラミングに不慣れな人でも直感的にテスト作成が可能です。エンタープライズレベルの機能を提供しつつ、無料プランも利用できるため、初心者から上級者まで幅広く利用されています。

  • 利用率:
  • 利用価格: 無料プランあり、エンタープライズプラン有料
  • 利用難易度: 初心者〜中級者向け
  • 公式サイト: Katalon Studio公式サイト

4. Applitools

概要

Applitoolsは、ビジュアルテストに特化したツールで、デザインやUIの変更をAIが自動的に検出します。特にビジュアルレグレッションテストに強く、UIやUXの一貫性を保つためのテストに最適です。デザインの細かな違いを検出する機能により、フロントエンドやデザインの品質保証に役立ちます。

  • 利用率:
  • 利用価格: 有料(無料トライアルあり)
  • 利用難易度: 初心者向け
  • 公式サイト: Applitools公式サイト

今回は、システム開発におけるAIを活用したテスト自動化ツールについて紹介しました。次回は、これらのツールを実際に使用してみた体験談や感想をお伝えしたいと思います。どのツールがあなたのプロジェクトに最適か、ぜひ参考にしてみてください。

【WordPress】How To Use Elementor (Grid Layout Creation)

This is Unit 0, focusing on web design. In this Engineers blog, I want to introduce some of the topics I’ve been working on daily. This time, I will explain how to use the WordPress plugin, Elementor. By using the Elementor plugin, you can intuitively create web page layouts with drag-and-drop operations. No programming skills are required. In this post, I will explain the basic usage of Elementor.

Elementor Installation and Validation

Elementor is not compatible with all WordPress themes, so we recommend using a supported theme. For this example, we are using the official Elementor theme: HelloElementor.

Booting Up Elementor

Go ahead and create a new fixed page. Now selsect “Edit with Elementor”

About Elementor Widgets

The features provided by Elementor are called “widgets.” You can see a list of widgets on the left side of the screen.

With the paid version, you can access more widgets. As of September 2024, there are four plans available for the paid version, with upgrades ranging from $59 to $399 per year.

Creating a Layout

First, use the “Layout” widget to determine the structure of your web page.

In Elementor, there are two types of page layouts: Flexbox and Grid.

In earlier versions, Elementor layouts were made up of “Sections,” but in recent updates, the concept of “Containers” has been introduced leading to the deprecation of “Sections”.

 In this example, we will create a layout using a Grid.

By default, a Grid layout with 3 columns and 2 rows will be created.

Detailed settings can be adjusted by clicking “Edit Grid” on the left side of the screen.

Placing Elements in the Grid

 You can easily create a web page by placing elements from the basic widgets.

Simply by using mouse operations, you can easily position content commonly used on web pages.

 In the future, I plan to cover more detailed setting methods.

As introduced previously, you can also easily conduct tests using the “LOCAL” environment so please give it a try. 

Stay tuned for the next technical blog post.

【WordPress】Elementorの使い方(Gridレイアウトの作成)

WEBデザインをテーマにしている第0ユニットです。

技術者ブログとして日ごろ取り組んでいる学習内容をご紹介します。

今回はWordPressの人気プラグイン「Elementor」の使い方をご紹介します。

Elementorプラグインを利用することで、ドラッグ&ドロップ操作で、直感的にウェブページのレイアウトを作成できます。

プログラミングのスキルは不要です。

今回はElementorの基本的な使い方を説明します。

Elementorのインストール&有効化

Elemenetorは全てのWordPressテーマで使用できるというわけではありません。推奨されるテーマを使いましょう。

今回はElementor公式のHelloElementorのテーマを使用しています。

Elementorの起動

固定ページを新規作成し、Elementorを起動します。

Elementorのウィジェットについて

Elementorが提供する機能は「ウィジェット」と呼ばれています。左側にウィジェットのリストが並んでいることが分かります。

有料版であればより多くのウィジェットを利用可能です。2024年9月時点では有料版には4つのプランがあり、$59~$399/1年でアップグレードが可能です。

レイアウトの作成

先ずは、ウィジェットの「レイアウト」を利用しウェブページの構造を決めます。

ElementorではウェブページのレイアウトのタイプはFlexboxとGridの2種類があります。

少し前のバージョンでは、Elementorのレイアウトは「セクション」というもので構成されていましたが、バージョンアップを経て「コンテナ」という考え方が導入されたことにより「セクション」が廃止されています。

今回はGridでレイアウトを作成します。

デフォルトでは横3列、縦2行のGridレイアウトが作成されます。

詳細な設定は、画面左部の「Gridを編集」にて可能です。

Gridに要素を配置

基本のウィジェットから要素を配置することで、簡単にウェブページが作成できます。

マウス操作だけで、簡単にウェブページで多用するコンテンツが配置できます。

今後は細かい設定方法についても見ていきたいと思います。

前回ご紹介した「LOCAL」の環境で簡単に試作できるので是非試してください。

次回の技術者ブログもお楽しみに。

技術者ブログ – UTMの強化設定

技術者ブログとして日ごろ取り組んでいる学習内容をご紹介します。
今回はインフラをテーマにしている第3ユニットです。

第3ユニットは、ダンデライオンズの社内ネットワークを管理しています。そのセキュリティを強化するために、FortiGateというUTM機器を導入しています。「UTM」は、「Unified Threat Management」の略であり、「統合脅威管理」という意味になります。つまり、一つの機器を以て、ネットワークセキュリティ全般を管理できます。

今回の技術者ブログでは、FortiGateの三つの機能を紹介します。

① Eメールフィルタ

スパム対策として、FortiGateが、受信するメールの内容を確認して、スパムの疑いがあると検知されたメールの件名に任意のタグを追加できます。

[Spam]というタグを追加しています。

② 侵入防止

プログラムの脆弱性、ボットネットとその他の侵入を防止する機能です。「その他の侵入」は、例えば、サーバーの認証系ファイルをアクセスしようとすることになります。

Linuxサーバーの認証系ファイルへのアクセスを防止します。

③ アプリケーションコントロール

特定のアプリケーション(プログラム)を使用不可に設定できる機能であると思いきや、個別に実行可能なプログラムにとどまらず、ウェブサイトの使用も制限できます。

YouTube(ウェブサイト)の使用を細かく制限できます。

次回の技術者ブログをお楽しみに。