Welcome to our engineer blog, where we share what we’re learning day to day. Recently, I had a chance to work with Git, so in this post, I’ll be explaining its basic concepts.
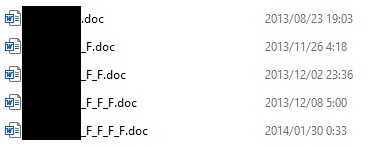
Have you ever saved multiple versions of the same file on an external hard drive or similar device, managing them by changing the filenames like this?
Multiple versions of the same file. “F” stands for “Final,” and the more F’s you have, the more “final” it seems.
This kind of versioning might be enough for personal files, but when it comes to managing source code in a large-scale project, a more precise and structured system is needed. That’s where Git comes in.
What Is Git?
Git is a Version Control System (VCS). Its role is to track and manage the history of changes to files. With this tracking, you can return files to a specific past state and compare or merge changes.
In particular, for projects involving multiple people, using Git makes it possible to visualize which files were changed, when, and by whom—helping to prevent accidental overwrites or unintended edits.
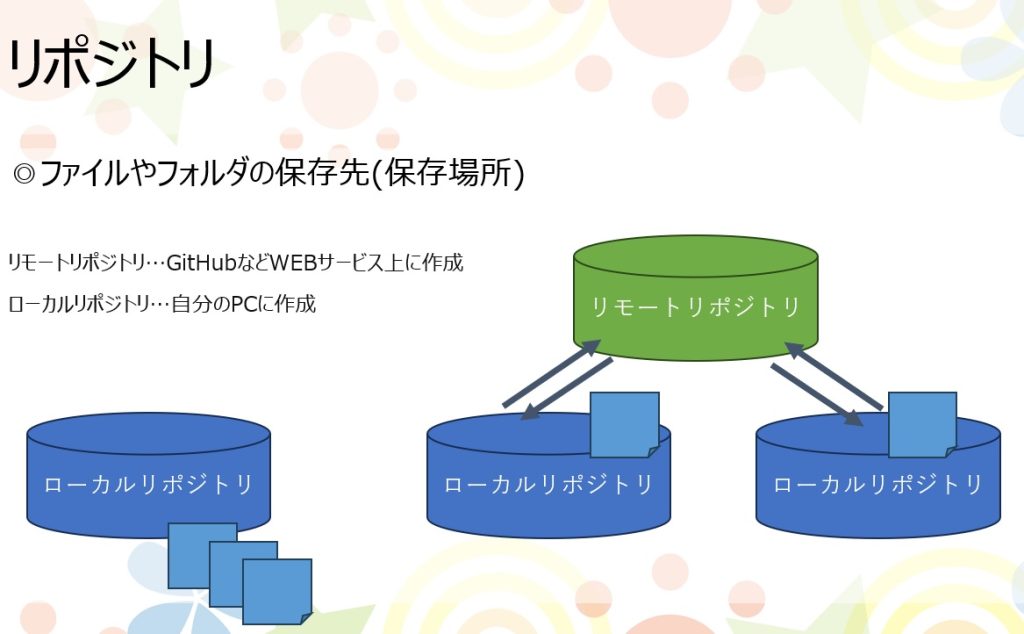
What Is a Repository?
The files managed by Git are stored in a repository. Repositories are generally classified into two types: local and remote. When saving files, it’s important to be aware of which repository your changes are being applied to.
Git is a distributed VCS, meaning each developer maintains a full history of the project in their local repository. This makes it possible to edit files and review history even while offline.
Remote repositories are hosted by providers like GitHub, GitLab, or Bitbucket. (Of course, you can also create and manage your own.) Because the storage is online, it becomes easy to share work and collaborate with others.
Types of Repositories
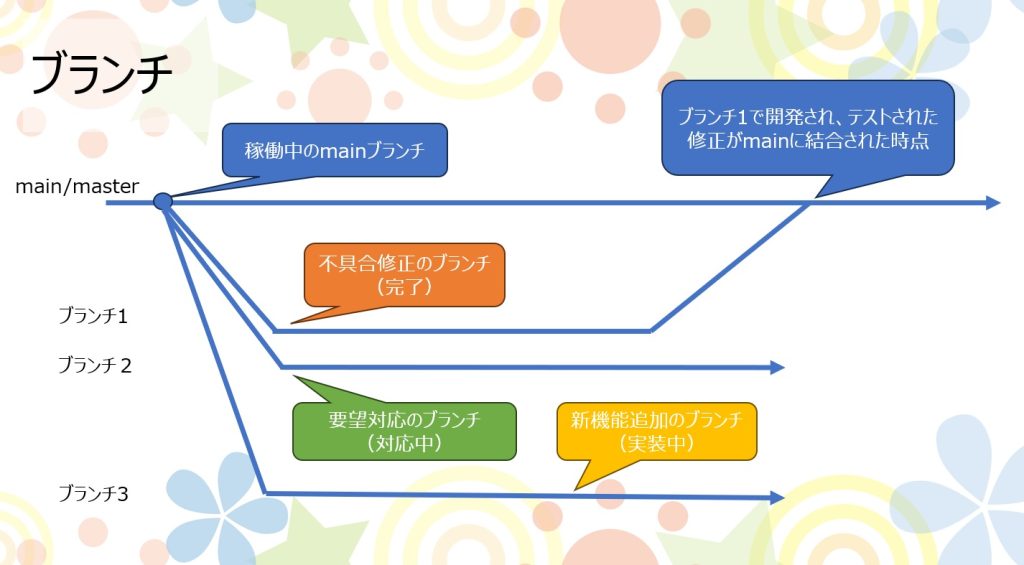
What Is a Branch?
When adding a new feature or making changes that might affect existing code in uncertain ways, it’s risky to update the main project source directly. In such cases, you can create an independent branch. This lets you safely develop and test features without impacting the main codebase.
Once the new feature or fix is complete and has passed testing, the branch can be merged into the main project to officially apply the changes.
Branching and Merging
Stay tuned for the next post in our Engineer Blog series!
Since then, more of our team members have gained experience with OutSystems, prompting us to conduct another trend analysis to explore the future outlook of low-code tools.
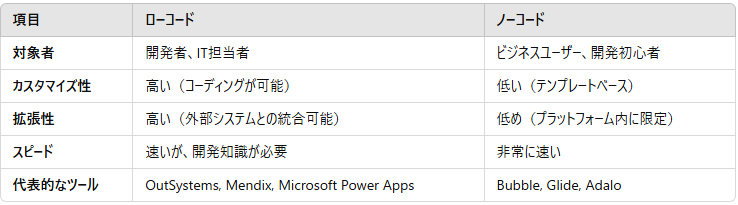
What Are Low-Code and No-Code?
The adoption of low-code and no-code tools is increasing to improve app development efficiency, enabling faster development and cost reduction.
Low-Code: Requires minimal coding for app development. Some programming knowledge is necessary, but it allows for flexible customization.
No-Code: Enables intuitive app creation without coding. However, customization options are more limited.
[Comparison table with representative tools]
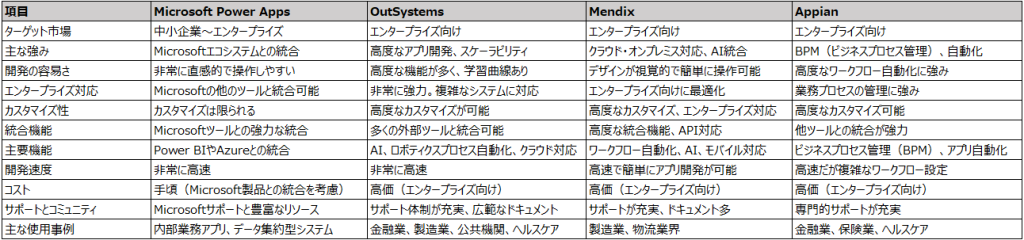
Comparison of Major Low-Code & No-Code PlatformsThe market share of low-code and no-code platforms is primarily based on industry recognition and the number of companies adopting them. Below are the leading platforms ranked by market share:
Microsoft Power Apps
A widely adopted platform due to its strong integration with Microsoft products (especially Office 365 and Azure). As part of the Microsoft ecosystem, it allows businesses to easily create and manage applications.
Adoption: Used by organizations of all sizes worldwide, from small businesses to large enterprises.
OutSystems
A low-code platform specializing in enterprise solutions, excelling in large-scale and complex app development. It features strong automation and AI functionalities and is particularly popular among large corporations.
Adoption: Commonly used in industries like finance, manufacturing, and public institutions.
Mendix
A low-code platform designed for enterprise applications, known for its integration with SAP and industry-specific approach. It supports both cloud-based and on-premises deployment, providing an advanced development environment.
Adoption: Frequently used in manufacturing and logistics industries.
Appian
Specialized in Business Process Management (BPM), this platform excels in process automation and complex workflow management. It is designed for enterprises looking to optimize business operations.
Adoption: Popular in industries such as banking, insurance, and pharmaceuticals.
Future of Low-Code and No-Code
The future of low-code and no-code tools looks promising, with market growth and technological advancements driving increased adoption. The integration of AI will further enhance development speed and expand possibilities for both enterprises and individual developers.
Market Growth
The global low-code/no-code market was valued at $17 billion in 2022.
It is projected to grow to $45 billion by 2027.
The market is expected to expand rapidly over the next 5–10 years.
Key Trends in the Low-Code/No-Code Market
Stronger Integration Between AI & Low-Code/No-Code AI will automate development processes, allowing for natural language-based app development, eliminating the need for manual coding. Additionally, AI will optimize UI/UX design and code generation.
Examples of AI Integration:
Power Apps’ “Copilot” and OutSystems’ “AI Mentor”
Developers can input commands like “Create a product management app”, and AI will automatically generate the application.
AI will analyze user behavior and optimize UI layout automatically.
With further AI advancements, even complex logic and data analysis will be handled by AI, accelerating the shift toward true no-code development.
Developers’ roles will transition from coding to designing and managing applications.
Conclusion
Based on market share, Microsoft Power Apps dominates the low-code space due to its strong integration with Microsoft’s ecosystem. However, OutSystems also maintains a strong position, particularly in enterprise applications.
While large enterprises have been the primary adopters, the question remains whether low-code tools will expand further into SMEs and general users.
Looking ahead, as low-code tools and AI continue to merge, developers will focus more on designing applications, while AI handles coding. Exploring how OutSystems can integrate with AI will be a key consideration moving forward.
For our next post, we’ll explore the potential of OutSystems and AI integration and what it can achieve. Stay tuned!
In this engirring blog, we introduce the learning topics we work on daily.
What is Local-First?
Recently, the concept of Local-First has been gaining attention. Many applications are designed with an online-first approach, where data is stored in the cloud. This allows users to access their data from any device and easily share it with others. However, applications that rely on online connectivity have several disadvantages, such as:
Data is inaccessible without an internet connection.
The application becomes unusable if the server goes down.
Communication with the server can introduce delays, reducing responsiveness.
Storing personal data in the cloud poses security risks from external access.
The Local-First approach addresses these issues. In Local-First applications, data is primarily stored on the user’s device and synchronized only when needed. This approach offers several benefits:
Data remains accessible even without an internet connection.
The application functions independently, unaffected by service outages.
Immediate data read/write operations without relying on a server.
Personal data is managed locally, reducing dependency on the cloud.
Examples of Local-First Applications
Several applications utilize the Local-First approach, including:
Evernote: Allows users to create and view notes even while offline. Synchronization with the cloud ensures data availability across devices.
Notion: An all-in-one productivity tool featuring document management, task tracking, and database functionality. Users can edit content offline, and changes are synced to the cloud to maintain data consistency.
Let’s Build an Application! (TypeScript Edition)
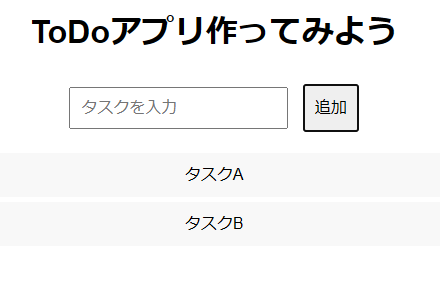
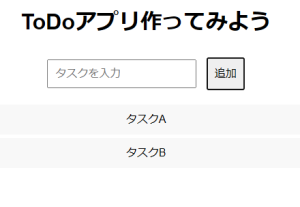
To experience the Local-First approach, let’s build a simple To-Do App that runs entirely within a browser! This application will store data locally, ensuring that tasks remain saved even after a page reload.
Below, we introduce the key implementation details.
ToDo の追加(データをローカルに保存)
async function addTodo(text: string) {
    const todo = {
        _id: new Date().toISOString(),  // 一意のID
        text,
        completed: false
    };
    // データをローカルに保存
    await db.put(todo);
}

ToDo の表示(保存されたデータを取得)
async function renderTodos() {
    const result = await db.allDocs({ include_docs: true });
    result.rows.forEach(row => {
        // タスクを取得して表示
        console.log(row.doc.text);
    });
}

ToDo の削除
async function deleteTodo(id: string) {
    const doc = await db.get(id);
    // タスクを削除
    await db.remove(doc);
}
Running the To-Do App
Open the application in a web browser.
Enter a task and click the Add button—the task will be added to the list below.
Close the browser. (Normally, this would cause the entered tasks to be lost.)
Reopen the application in the browser. (The previously entered tasks remain displayed.)
Click on a task to delete it.
Thoughts on Running the App
One of the standout features of this To-Do App is its ability to function independently of the internet, managing data entirely within the browser. By storing data locally, users can continue using the application even while offline.
Key Takeaways:
Data persists even after a page reload!
The app works without a server!
Fast performance with instant data retrieval!
Applications that don’t rely on servers or the cloud might seem somewhat uncommon, but the Local-First approach proves to be highly valuable for offline functionality and data privacy. While this project was a simple implementation, it could be extended with cloud synchronization or mobile support for a more versatile experience.
Exploring the possibilities of Local-First applications has been insightful, and I look forward to leveraging this concept further.
Welcome to our engineer blog, where we share our ongoing learning experiences. This post is part of Unit 0, which focuses on web design. Today, I’d like to introduce an opportunity I had to work with something less commonly encountered: QR code generation.
Preparation
For this implementation, I used Java. Since my development environment is Gradle-based, adding the necessary libraries was as simple as including the following in the build.gradle file. (Isn’t it convenient how accessible things have become these days?)
The library used here is ZXing, an open-source Java library that enables the creation and reading of one-dimensional codes (such as barcodes) and two-dimensional codes (like QR codes).
Implementation
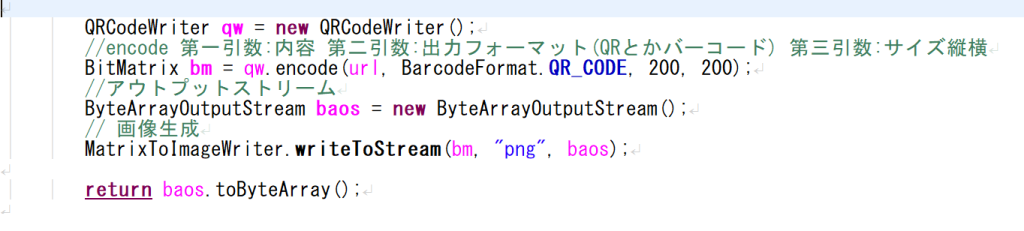
The key element for generating QR codes is the encode method of the QRCodeWriter class. As summarized in the comments, the following parameters can be specified:
The generated data is stored in a variable of type BitMatrix (bm). By specifying the output format in the writeToStream method, you can save the generated QR code in your desired format. In this case, we output the QR code in PNG format.
While the actual implementation involves handling API requests and returning the output result to the screen, I’ll omit those details here.
Summary
Nowadays, if you just want to generate a QR code once for testing purposes, there’s no need to write a program from scratch. You can find many online QR code generators with just a quick search. Some even let you customize the design or offer formats tailored to specific use cases, making them surprisingly fun to explore.
This post covered only the basics, but I hope it gave you an idea of how QR code generation works. If you found this interesting, I’d be delighted.
Stay tuned for the next engineer blog post!
P.S. The content of the QR code includes a closing message!
Welcome to our engineering blog, where we share the learning experiences we’re engaged in daily. This time, we’re focusing on low-code development in Unit 2.
Today’s Theme: Migrating Outsystems Database to an External DB
In Outsystems, you can request a free cloud version called the Personal Environment (PE) by creating an account. (What is an OutSystems Personal Environment – OutSystems Support) Using this environment, you can develop personal applications for small-scale users and are provided with 2GB of database storage.
However, there are some inconveniences, such as limited storage capacity and the inability to access the database directly from external sources. To address these issues, we decided to migrate the internal database created in Outsystems to an external database while keeping the table definitions unchanged. Below are the results of this migration.
Environment Information
Personal Environment: Version 11.31.0 (Build 43948) Service Studio: Version 11.54.80 / Build 63652 Data Extractor: 1.4.0
About Data Extractor
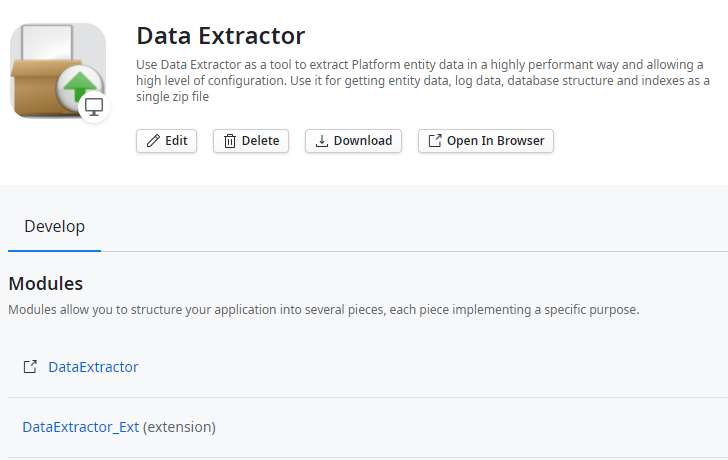
By using Data Extractor, freely available on the Forge, you can obtain the actual table DDL corresponding to the Entities created in Outsystems. Here’s how to use it:
Install “Data Extractor” from the Forge.
Launch the application via “Open In Browser.”
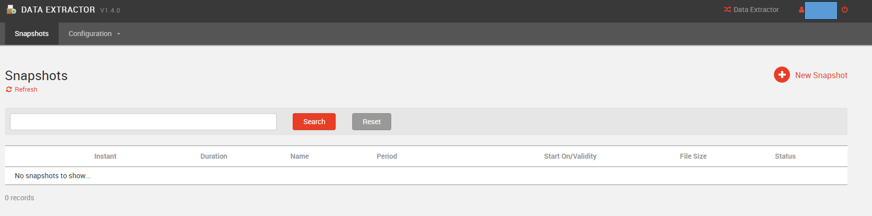
Log in by entering your ID and password.
Create a new snapshot by clicking “New Snapshot” on the top page.
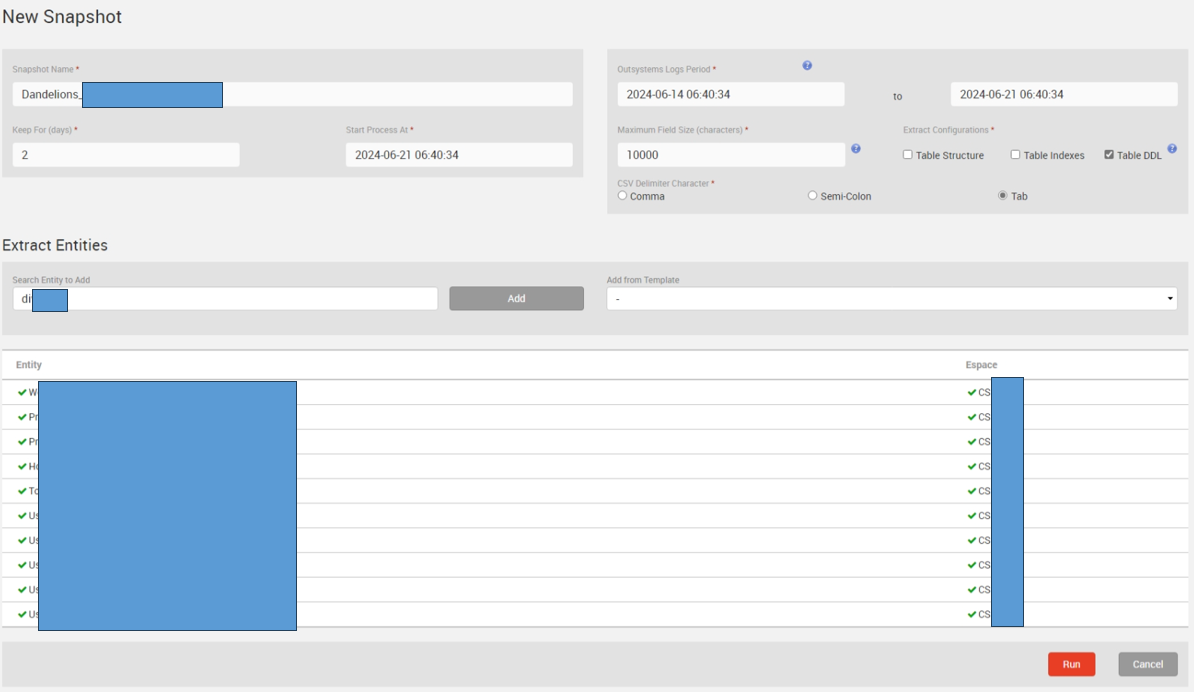
Configure the new snapshot with the following settings: ・Snapshot Name: Give your snapshot a name. Any name is fine. ・Extract Configurations: Check the “Table DDL” option. Other items are optional. ・Extract Entities: Add the Entities for which you want to output the DDL to the list. Use the “Search Entity to Add” feature to find Entities by prefix matching. Select the desired Entity and click “Add” to include it in the list. ・Other Items: Optional. Configure as needed.
Click the “Run” button. Your snapshot will appear in the list on the top page with the status “Created.” Once the status changes to “Done,” you can download it by clicking the “↓” icon on the far right.
Contents of the downloaded Zip file: ・[TableName].csv.gz: Export of data registered in the Entity. ※Note: In our testing environment, Japanese characters were displayed as “?” and could not be read correctly. ・TableDDL.Create.sql.gz: DDL of the actual table corresponding to the Entity. ※Includes the following: ・Create Table statements ・Alter Table statements to add foreign key constraints to columns of the Entity Identifier type ・Create Index statements to add indexes to columns of the Entity Identifier type
By executing the Create Table statements obtained through these steps, you can create tables with the same layout as the internal database on your own SQL Server.
To reference the tables created in the external database from Outsystems, you’ll need to create a Database Connection via the Service Center and then set up the connection to the tables through “Connect to External Table or View” in Integration Studio.
Summary
Outsystems provides an internal database by default.
To migrate to an external database, you can obtain the Entity’s DDL using the Data Extractor from the Forge.
For data migration, alternative methods may be necessary since columns containing Japanese characters might become garbled.
Referencing tables in the external database requires creating a Database Connection and setting up connections through it.
How did you find this guide? We hope these steps will be helpful when you consider externalizing your own database in the future. Our Unit 2 team will continue to share engineering blogs using low-code tools like OutSystems, so stay tuned!